
How to Make Cold Brew Concentrate
Cold brew concentrate is one of the easiest ways to prepare smooth, refreshing coffee at home. Unlike hot coffee, it is made by soaking ground beans in cool or room-temperature water for several hours. The result is a rich coffee base that can be diluted with water or milk whenever you want a drink.
The best part? You don’t need expensive equipment or special barista skills. With good coffee, clean water, a container, and a reliable strainer, you can make a batch that lasts for several servings.
What Is Cold Brew Concentrate?
Cold brew concentrate is a strong coffee liquid produced by steeping coarsely ground coffee in water for an extended period. Instead of drinking it straight, you normally dilute it with water, milk, or another liquid.
Think of the concentrate as a coffee “base.” Just as tomato paste can be turned into a sauce by adding other ingredients, concentrated cold brew can become a complete drink once you add water or milk.
Because the coffee is extracted without hot water, the finished drink can have a smooth and mellow character. However, the final flavor depends heavily on the beans, grind size, water quality, ratio, and steeping time.
Why Make Cold Brew Concentrate at Home?
There are several reasons to prepare your own concentrate.
Convenience is probably the biggest advantage. You can prepare one batch and keep it refrigerated for several days, giving you a ready-to-use coffee base whenever you want one.
It can also be customized to your taste. Want something stronger? Use less dilution. Prefer a lighter drink? Add more water or milk.
Another benefit is that homemade cold brew can be economical. Instead of buying an individual café drink every morning, you can make multiple servings from one batch.
Most importantly, you control every part of the process. You choose the beans, grind them yourself, determine the strength, and decide what goes into your final cup.
Ingredients and Equipment You Need
You don’t need a complicated setup.
Basic ingredients:
- Coarsely ground coffee
- Filtered or clean drinking water
Useful equipment:
- Large jar, pitcher, or French press
- Kitchen scale or measuring cups
- Coffee grinder, preferably a burr grinder
- Fine-mesh strainer
- Paper coffee filter or reusable filter
- Clean bottle or airtight container for storage
A kitchen scale is especially useful because coffee beans and water can vary significantly in volume. Measuring by weight makes your results much easier to repeat.
If you don’t own a grinder, ask your coffee shop to grind the beans for cold brew. Request a coarse grind rather than a fine espresso-style grind.
Choosing the Right Coffee Beans
The coffee you choose has a major influence on the finished concentrate.
A medium or medium-dark roast can produce a rich, chocolatey drink, while lighter roasts may offer brighter fruit or floral notes. There isn’t one universally correct choice.
For a smoother, traditional-style cold brew, look for beans described with notes such as:
- Chocolate
- Caramel
- Nuts
- Brown sugar
- Cocoa
If you enjoy fruity coffee, a lighter roast can be interesting too.
Freshness matters as well. Beans that have been stored properly and used reasonably fresh generally provide better flavor than stale coffee.
Don’t worry about finding the “perfect” bean on your first attempt. Cold brew is forgiving, so experimentation is part of the fun.
The Best Coffee-to-Water Ratio
The ratio determines how concentrated your coffee will be.
A practical starting point is approximately 1 part coffee by weight to 4 parts water for a strong concentrate.
For example:
- 100 grams coffee
- 400 grams water
This produces a strong base that you can dilute later.
If you want something less intense, you can use a ratio closer to 1:5. For an especially strong concentrate, some people go toward 1:3, although this can become quite powerful and may require more dilution.
The important thing is consistency. Once you find a ratio you enjoy, write it down and use the same measurement next time.
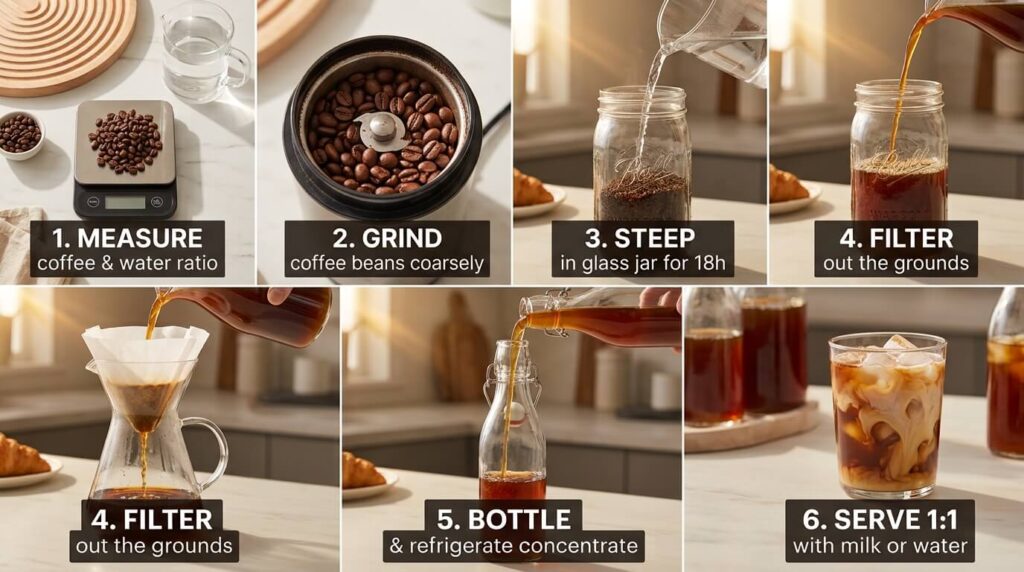
How to Make Cold Brew Concentrate Step by Step
Now let’s get to the main process.
1. Grind the Coffee
Start with whole coffee beans and grind them coarsely.
The texture should resemble coarse breadcrumbs rather than flour. A grind that is too fine can make the coffee muddy and difficult to filter.
2. Combine Coffee and Water
Place the coffee grounds into your jar or brewing container.
Add the measured water slowly, making sure all the grounds become wet. Stir gently with a spoon to ensure there are no large dry pockets.
Don’t aggressively stir the mixture. You only need enough movement to distribute the grounds.
3. Cover and Steep
Cover the container and leave it at room temperature or in the refrigerator, depending on your preferred method.
Allow the coffee to steep for approximately 12 to 18 hours as a starting point.
The exact time isn’t a magic number. Your beans and personal taste can change the ideal brewing period.
4. Strain the Coffee
Once the steeping period is complete, separate the liquid from the grounds.
First, use a coarse strainer to remove most of the coffee particles. Then pass the liquid through a paper coffee filter or another fine filter.
This second filtration step can make the concentrate noticeably cleaner.
5. Transfer to a Clean Container
Pour the filtered concentrate into a clean, airtight bottle or jar.
Place it in the refrigerator until you’re ready to use it.
How Long Should Cold Brew Steep?
Steeping time is one of the easiest things to adjust.
A shorter steep can produce a lighter and sometimes brighter result. A longer steep generally produces a stronger and heavier coffee profile, although longer does not automatically mean better.
A good starting range is 12 to 18 hours.
If your first batch tastes weak, consider extending the steep slightly or increasing the coffee ratio next time.
If it tastes harsh, overly bitter, or unpleasantly heavy, try reducing the steeping time or adjusting your coffee-to-water ratio.
Don’t change everything at once. If you alter the grind, ratio, beans, and steeping time simultaneously, you won’t know which change improved the result.
How to Strain and Store the Concentrate
Straining is more important than many beginners realize.
Coffee particles left in the concentrate can continue affecting the texture and flavor. A paper filter can help remove fine sediment and produce a cleaner drink.
After filtering, store the concentrate in a clean, sealed container in the refrigerator.
Use clean utensils when serving it, and avoid leaving the concentrate sitting at room temperature for extended periods.
For the best flavor, many home brewers prefer using refrigerated cold brew within about a week, although storage life can vary depending on cleanliness and handling.
When in doubt, use your senses. If the coffee develops an unusual smell, appearance, or taste, it is better to discard it.
How to Dilute and Serve Cold Brew
Your concentrate is not necessarily designed to be consumed straight.
Start by combining approximately 1 part concentrate with 1 part water, then adjust according to taste.
For example:
- 100 ml concentrate
- 100 ml water
- Ice
If you prefer stronger coffee, use more concentrate. If you want a lighter drink, increase the water.
You can also replace some or all of the water with milk.
Classic Iced Cold Brew
Fill a glass with ice, add your desired amount of concentrate, and top with cold water.
Cold Brew With Milk
Combine concentrate with chilled dairy or plant-based milk. Add a little sweetener if desired.
Vanilla Cold Brew
Add a small amount of vanilla syrup or vanilla extract and stir well.
Cold Brew With Sweet Cream
Top your diluted coffee with a small amount of sweet cream for a richer drink.
The beauty of concentrate is flexibility. One batch can become several different drinks.
Common Mistakes to Avoid
Even though the method is simple, beginners sometimes run into a few predictable problems.
Using finely ground coffee: Fine grounds can make filtering difficult and may produce a gritty drink.
Using the wrong ratio: Too much coffee can create an overly intense concentrate, while too much water can leave you with a weak base.
Steeping indefinitely: More time isn’t always better. Excessive steeping can produce an unpleasant flavor.
Skipping filtration: Tiny coffee particles can make the final drink cloudy and gritty.
Using poor-quality water: Coffee is mostly water, so water quality can have a surprisingly large effect on the final cup.
Changing too many variables: Keep your first recipe simple. Adjust one factor at a time.
Ignoring storage: Refrigerate your finished concentrate in a clean, sealed container.
Ways to Customize Your Cold Brew
Once you’ve mastered the basic recipe, you can experiment.
Try different coffee origins to discover how beans from different regions affect flavor. You can also compare light, medium, and dark roasts.
For sweetness, try:
- Simple syrup
- Maple syrup
- Honey
- Vanilla syrup
- Caramel syrup
You can also add milk, oat milk, almond milk, or another favorite alternative.
For a refreshing variation, serve cold brew over ice with sparkling water. A small amount of citrus zest can also create an interesting flavor combination.
Keep a simple brewing note with the bean, ratio, grind, steeping time, and final taste. This turns experimentation into a repeatable process rather than guesswork.
How to Get Better Results Every Time
The easiest way to improve is to treat every batch as a small experiment.
Start with one reliable recipe and record your results. If the coffee tastes too weak, adjust the ratio or steeping time. If it tastes too strong, dilute it more or make the next batch less concentrated.
Pay attention to grind consistency. A burr grinder generally produces more uniform particles than a basic blade grinder, which can help with more predictable extraction.
Water temperature and brewing environment can also influence the result. If you make several batches, try to keep your process consistent so that you can identify meaningful differences.
Most importantly, trust your palate.
Coffee preferences are personal. A recipe that someone else considers perfect may taste too strong or too mild to you. Your goal isn’t to copy somebody else’s cup—it is to create one you genuinely enjoy.
Conclusion
Learning how to make cold brew concentrate at home is surprisingly straightforward. Start with coarse coffee grounds, clean water, a dependable ratio, and a patient steeping period. After filtering and refrigerating the concentrate, you can dilute it with water or milk whenever you’re ready for a cold coffee.
Once you’ve mastered the basic method, experiment with beans, ratios, steeping times, and serving styles. Think of the first batch as your starting point rather than your final recipe.
Frequently Asked Questions
1. How long should cold brew concentrate steep?
A good starting point is around 12 to 18 hours. You can adjust the time based on the flavor and strength you prefer.
2. What coffee grind is best for cold brew concentrate?
A coarse grind is generally best. It makes the coffee easier to filter and helps reduce excessive sediment.
3. What ratio should I use for cold brew concentrate?
A practical starting point is approximately 1 part coffee to 4 parts water by weight. You can adjust the ratio based on your preferred strength.
4. Can I drink cold brew concentrate without diluting it?
You can, but concentrate is intentionally strong. Most people dilute it with water, milk, or another liquid to create a balanced drink.
5. How should I store homemade cold brew concentrate?
Store it in a clean, sealed container in the refrigerator. For best quality, use it relatively soon and discard it if its smell, appearance, or taste becomes unusual.